
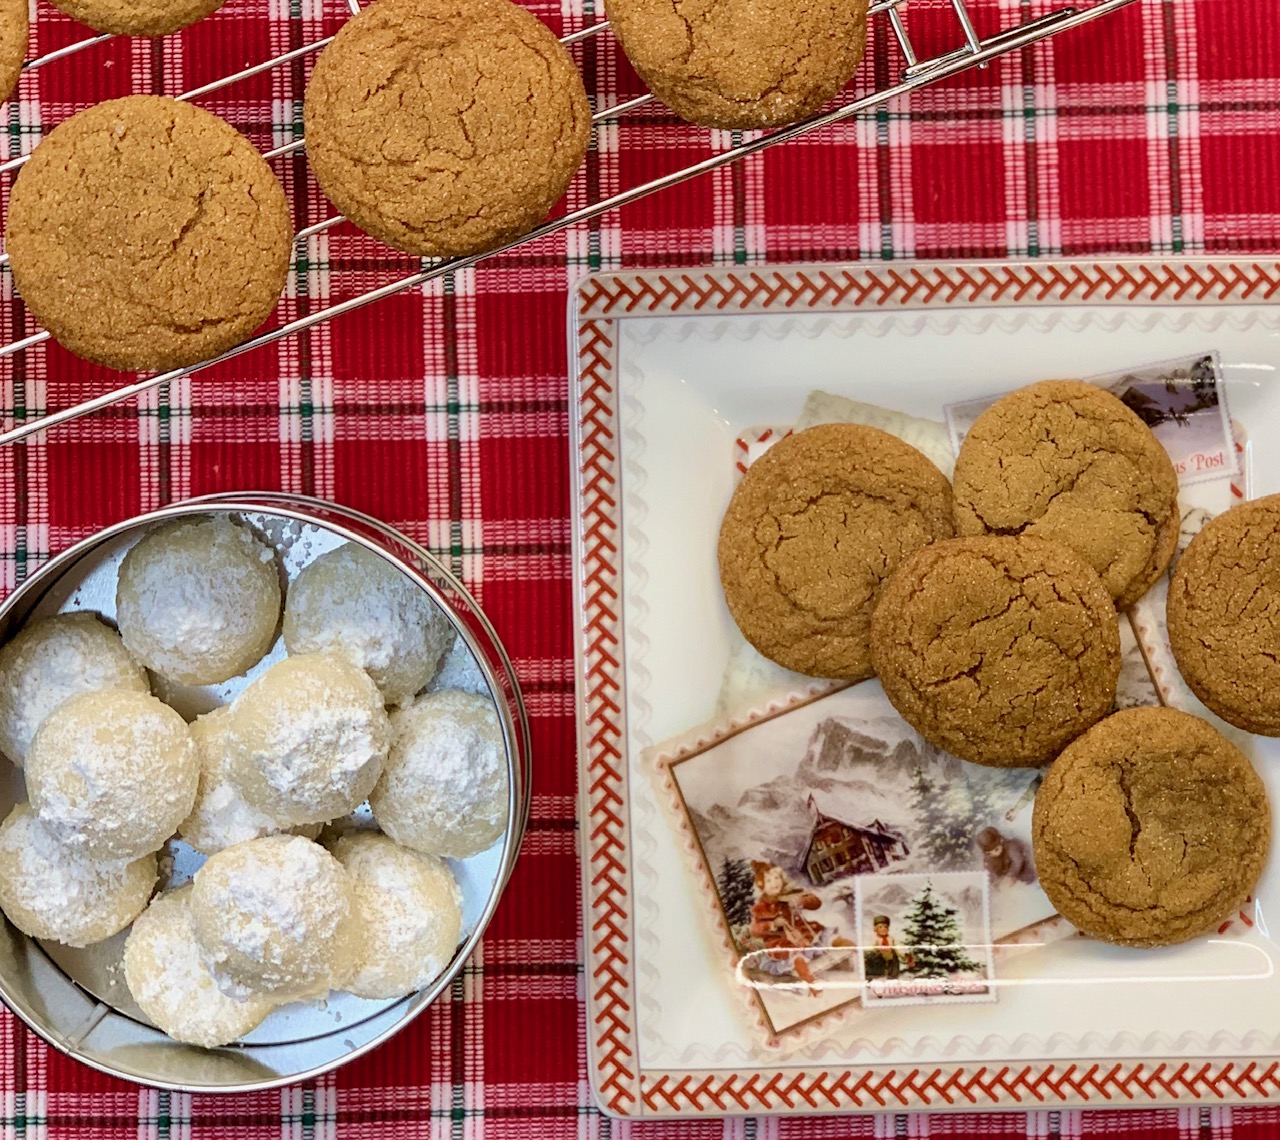
Chewy Ginger Molasses Cookies and Vegan Russian Tea Cakes

Get ready to celebrate National Cookie Day on December 4 with a batch of warm and delicious homemade cookies. Every cookie is a trip down memory lane, a reminder of your childhood, and every Christmas that ever was. Make everyone merry with a batch of their favorite. Save some for the cookie tray, then pack up the rest in a special tin just for them.
Chewy Ginger Molasses Cookies are easy to make, soft and chewy, and oh-so-delicious. You can halve the recipe and make a smaller batch, but I recommend making the recipe as is. You can never have enough cookies on hand, especially during the holidays, when any and all cookies seem to have a magical way of disappearing. The 4 teaspoons of baking soda is not a typo. This recipe needs that amount in order to rise properly.
If you want to make another batch of cookies quickly, try these Vegan Russian Tea Cakes. Buttery and delicate, they melt in your mouth, and they look just like little powdered sugar-coated snowballs, so they’re perfect for a festive gift. You can use regular butter and flour if you don’t need these to be plant-based or gluten-free, and other nuts will work here, too. Try swapping in pecans and adding a little cinnamon to make Mexican Wedding Cookies.
Keep your cookies uniform by rolling all of your balls the same size. I like mine to be about 1-inch in diameter. They will not spread so you can get about 20 cookies on 1 sheet, which really speeds things along. Let them set on the sheet for a few minutes after you bake them. You’ll know that you removed them too soon if they crumble, which is not a total loss because that means you get to try one, and they are simply divine!
I had quite a few mishaps this week, so before you start into this year’s holiday baking, here are a few tips to help you bake your best cookies every time. First and foremost, be sure to read the recipe before you start. Pay special attention to ingredients that need to be at room temperature or dough that needs to be refrigerated overnight, so you can plan accordingly. I wish I would have done this.
Start with fresh ingredients if possible. Your ingredients can absorb odors and flavors during storage, imparting some not so desirable qualities to your baked goods. Be wary of storage canisters, butter that has picked up a refrigerator smell, and spices that are too old. Also, steer clear of hand lotions and fragranced hand soaps when you’re baking.
Baking is more precise than other types of cooking, so measure carefully. Be sure to use a liquid measure for wet ingredients and to level off dry ones with a spatula. Better still, use a kitchen scale if you can, measuring by weight if possible. Be cautious about making substitutions, especially where flour, sugar and fat are concerned, and be prepared to adjust other ingredients accordingly.
Take time to preheat your oven and also try to give your oven a few minutes to return to temperature between batches. Because ovens usually apply heat in cycles, try to avoid opening the door while baking. This will release a lot of heat in just a short amount of time.
Be ready to refrigerate. Some doughs need to be chilled first, and chilled dough is easier to shape and will spread less during baking, too. If your dough won’t hold together, or you’re having a hard time handling it, refrigerate.
Portion size matters. Use a ruler to cut evenly when slicing, or use a cookie scoop or measuring spoon so that every cookie is an equal size. This ensures even baking as well as pretty cookies. Place your portions carefully on your baking sheet with enough space around each cookie to allow for spreading, about two inches apart unless the recipe states otherwise. And plan to use more than one baking sheet. You can fill one while the other bakes, just be sure your sheets cool completely between batches.
Be sure to set a timer and keep a close eye on your cookies. Usually, when you can smell a cookie, it’s done or almost done. Once you figure out the correct amount of time for each cookie, write it down. Don’t remove your cookies from the pan right away, unless the recipes instructs you to do so. Let your cookies stay on the sheet for a few minutes, then remove them carefully with a spatula and let them finish cooling on a wire rack.
Enjoy a warm cookie, or two, and store the rest properly. Glass containers help keep cookies crisp, plastic ones are better for keeping cookies soft. You can also put an apple wedge or a piece of bread in with your soft cookies. Store each variety of cookie separately so that flavors don’t mix and textures stay the same.
Get in the holiday spirit and get baking!
Chewy Ginger Molasses Cookies
- 4 1/2 cups (639 grams) all-purpose flour
- 4 teaspoons baking soda
- 2 teaspoons ground cinnamon
- 1 Tablespoon ground ginger
- 1 teaspoon ground cloves
- 1 teaspoon salt
- 1 1/2 cups unsalted butter, softened to room temperature (not melted)
- 1 cup sugar
- 1 cup packed brown sugar
- 1/2 cup unsulphured molasses
- 2 eggs
Whisk flour, baking soda, cinnamon, ginger, cloves, and salt together in a medium bowl. Set aside.
In a large bowl, either with a stand mixer or a hand mixer, cream together the softened butter and sugars on medium-high speed. Mix until light and fluffy, scraping down sides occasionally as needed, about 2 minutes. Add eggs one at a time, beating on medium-low speed until combined. Gradually add dry ingredients, mixing until evenly incorporated.
Cover dough tightly and refrigerate at least 2 hours, or until dough is thoroughly chilled.
Preheat oven to 350º F. Line 2 baking sheets with parchment paper and set aside.
Fill a small bowl with sugar. Roll dough into small balls, about 1-inch in diameter, rolling each ball in sugar until it is completely coated. Place dough balls onto prepared baking sheet spacing about 3 1/2-inches between, about 12 per sheet.
Bake 8-10 minutes, until cookies begin to slightly crack on top. (They will crack more while cooling.) Remove from oven and let cool for 4-5 minutes, then transfer cookies to wire racks to cool completely. Enjoy warm or store in a sealed container for up to 4 days. Can be frozen up to 3 months.
Vegan Russian Tea Cakes
- 1 cup plant-based butter
- 1/3 cup sugar
- 2/3 cup ground almonds
- 1/2 teaspoon almond extract
- 1 2/3 cups gluten-free flour (or all-purpose, if desired)
- 1/4 teaspoon salt
- 1/4 cup powdered sugar
In a large bowl, either with a hand mixer or a stand mixer, cream together vegan butter and sugar on medium-high speed until light and fluffy. Mix in ground almonds, almond extract, gluten-free flour and salt until you get a soft dough. Separate dough into 2 halves, then roll each half into a log, about 1 1/2-inches in diameter. Wrap each log in clingfilm and refrigerate for at least half an hour. (Dough can be frozen at this point, if desired.)
Preheat oven to 170º C (338º F) and line two large baking sheets with parchment paper. Remove one dough log from refrigerator; slice log into 1/2-inch wide sections and roll each section into a ball about 1-inch in diameter. Place balls on baking sheet and bake just until cookies turn pale golden, about 15 minutes. Let stand on baking sheet for a few minutes.
Pour powdered sugar Into a shallow dish. While cookies are still warm, roll into icing sugar until they are thoroughly coated, transferring to a wire rack as you go. Repeat with remaining dough log.
Donna Ferguson
I love to cook, garden, and write about all the things in Vancouver and the Northwest that make life so great.