“All disease begins in the gut” — Hippocrates
Your intestines are home to 100 TRILLION microorganisms! These microorganisms are known as our gut flora, and their job is so important to our bodies and our health that they are sometimes referred to as the “forgotten” organ. When we eat we’re not just feeding ourselves, we’re also feeding those microorganisms. But what a lot of people don’t realize is that their gut flora may be out of balance and not working as well as it should. Ingestion of toxins, antibiotics (they kill of the “bad” bugs, but also kill of the good ones), NSAIDS (pain relievers), birth control, stress, infections, and even things like wheat and industrial seed oils, can all damage our gut flora.
Our intestines do far more than make poop. Seventy-five percent of our immune system resides in our intestines. And our guts also help regulate our metabolism. Problems in the gut have been linked to a long list of problems, examples are: skin issues, chronic fatigue syndrome, depression, diabetes, rheumatoid arthritis, inflammatory bowel disease, and autoimmune conditions.
Taking steps to replenish the health of your intestines is so very important. One easy addition to your diet that can replenish those good microorganisms in your gut is a probiotic source.
You can get probiotics in supplement form, or from something like store-bought yogurt. But yogurt can include extra sweeteners and ingredients that are not so beneficial to our health. Other sources of probiotics are kefirs and kombucha. If you’ve ever purchased a bottle of kefir or kombucha, you know they’re not cheap. And if you consume them on a regular basis the cost can really add up. But I’m here to bring you great news! You can make milk kefir, water kefir, and kombucha at home and save LOTS of money! Not only that, but you will be in control of how your products are flavored, and what ingredients get used.
Today we will go over how to make milk kefir, with kombucha and water kefir to follow in future posts.
First thing you need: milk kefir grains! These “grains” are not really grains (like wheat), they are really like gelatinous little blobs of bacteria and yeast that live happily together in a symbiotic relationship, eating up all the lactose and turning it into beneficial probiotics. The term “grains” is used to describe the appearance of the kefir culture. You can purchase your grains on-line at sites like Culturesforhealth.com, or even better, you can purchase them locally at stores like Neighbor’s Market at 1707 Main St. in Vancouver.
You’ll start off with a box of dehydrated grains that come with instructions on how to rehydrate them and kick them into kefir-making gear.
Making kefir is really easy, but it is a commitment. Every 48 hours you will need to strain out your kefir grains to separate the kefired milk, and make a new batch. I kefir about 6 cups of milk every 48 hours, and it takes me about 10 minutes to strain the grains, wash out my equipment, and make a new batch. Not really a huge time consumer. An important thing to keep in mind: those kefir grains are alive and need to be fed. They feed off the lactose (milk sugar) in milk, and it takes about 48 hours for all the lactose to be consumed. If you wait too long past that point to give your precious kefir babies more food, they begin to starve. If you take care of your kefir grains, they can live forever.
What happens when you go on vacation? Well, I take my kefir with me. If that’s not possible, you can always refrigerate your grains while you’re away. Refrigeration slows them way down, and then they would just have to go through a wake-up period when you get home (meaning the first one or two batches may not kefir all the way).

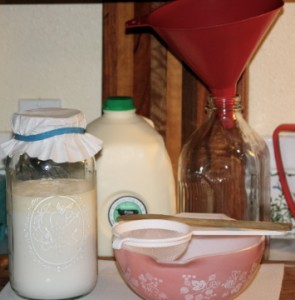
Gathering supplies: kefired milk (in mason jar), bowl, wooden spoon, plastic strainer, plastic funnel, clean glass jar for kefired milk.
A quick run-down:
(After you’ve followed the steps to rehydrate your kefir grains)
It’s time to strain your kefir:
- Gather your supplies: bowl to strain kefir into, plastic strainer (use plastic, not metal), wooden spoon, glass jar to store kefir in, plastic funnel, and the jar your kefir grains and milk are in.
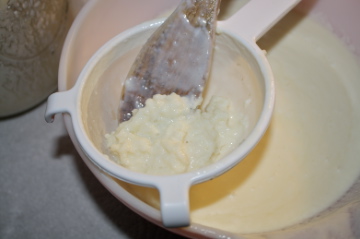
- Place plastic strainer on bowl, pour some kefir into strainer and stir with wooden spoon until all kefir has strained into bowl. Continue until all kefir is strained, and you’re left with your kefir grains in the strainer.
- Pour kefired milk from bowl into your glass storage jar using the funnel. I use a glass milk bottle that I had on hand. The bowl that I use is too small to hold all the kefired milk, so I have to pour some into the storage jar as I go along.
- Wash out the now empty glass jar you use to kefir your milk in. Pour your kefir grains back into that jar once cleaned. (Kefir grains continue to multiply, so you will need to periodically, maybe even every 48 hours, remove some of the grains. You can eat them, feed them to your dog/cat/chickens, or share them with a friend who wants to start making kefir).
- Add new milk to your kefir grains. Cover jar with a paper towel or coffee filter and secure with a rubber band, and place jar back in it’s home (on your counter, or in your pantry**).
- Put the other jar that has your kefired milk in it into the refrigerator. Or make yourself a smoothie right away and enjoy!
**Kefir cultures out on your counter. It needs to be about 68 degrees in your house for the grains to do their job. Colder temperatures mean it will take longer to culture, warmer temps mean it may culture more quickly. No need to be worried about milk left out on the counter. There is an amazing process of fermentation happening inside that jar that means the milk is not going bad…it’s getting better!
Cultures For Health is the company my grains came from. They have a great website full of information and videos on what kefir is, how to make it, and what to do if you run into issues. Their customer service line is pretty helpful as well.
I’ve read that people with lactose intolerance may be able to consume milk kefir with no adverse effects, since the kefir grains eat up all the lactose in the milk. But you can also substitute milk with coconut milk. Or you can make water kefir which just requires water and sugar.
I had already made kombucha and water kefir when I started making milk kefir, so I knew what I was getting myself into. If you’ve never made any of these yummy probiotic beverages before, please don’t be hesitant! Homemade is the way to go, it’s good for your pocket book and even better for your health!
I make smoothies everyday for myself, husband, and kids with the milk kefir. Ingredients vary occasionally, but usually our smoothies include things like: frozen berries, banana, almond butter, spinach, vitamin C powder, spirulina, and hemp protein powder. These smoothies have been great for me as a breakfast, and to drink before working out.
Do you make milk kefir? I’d love to hear about what your experience has been.
If you have questions, please leave them here in the comment section.
Happy kefiring!

