
Anginetti
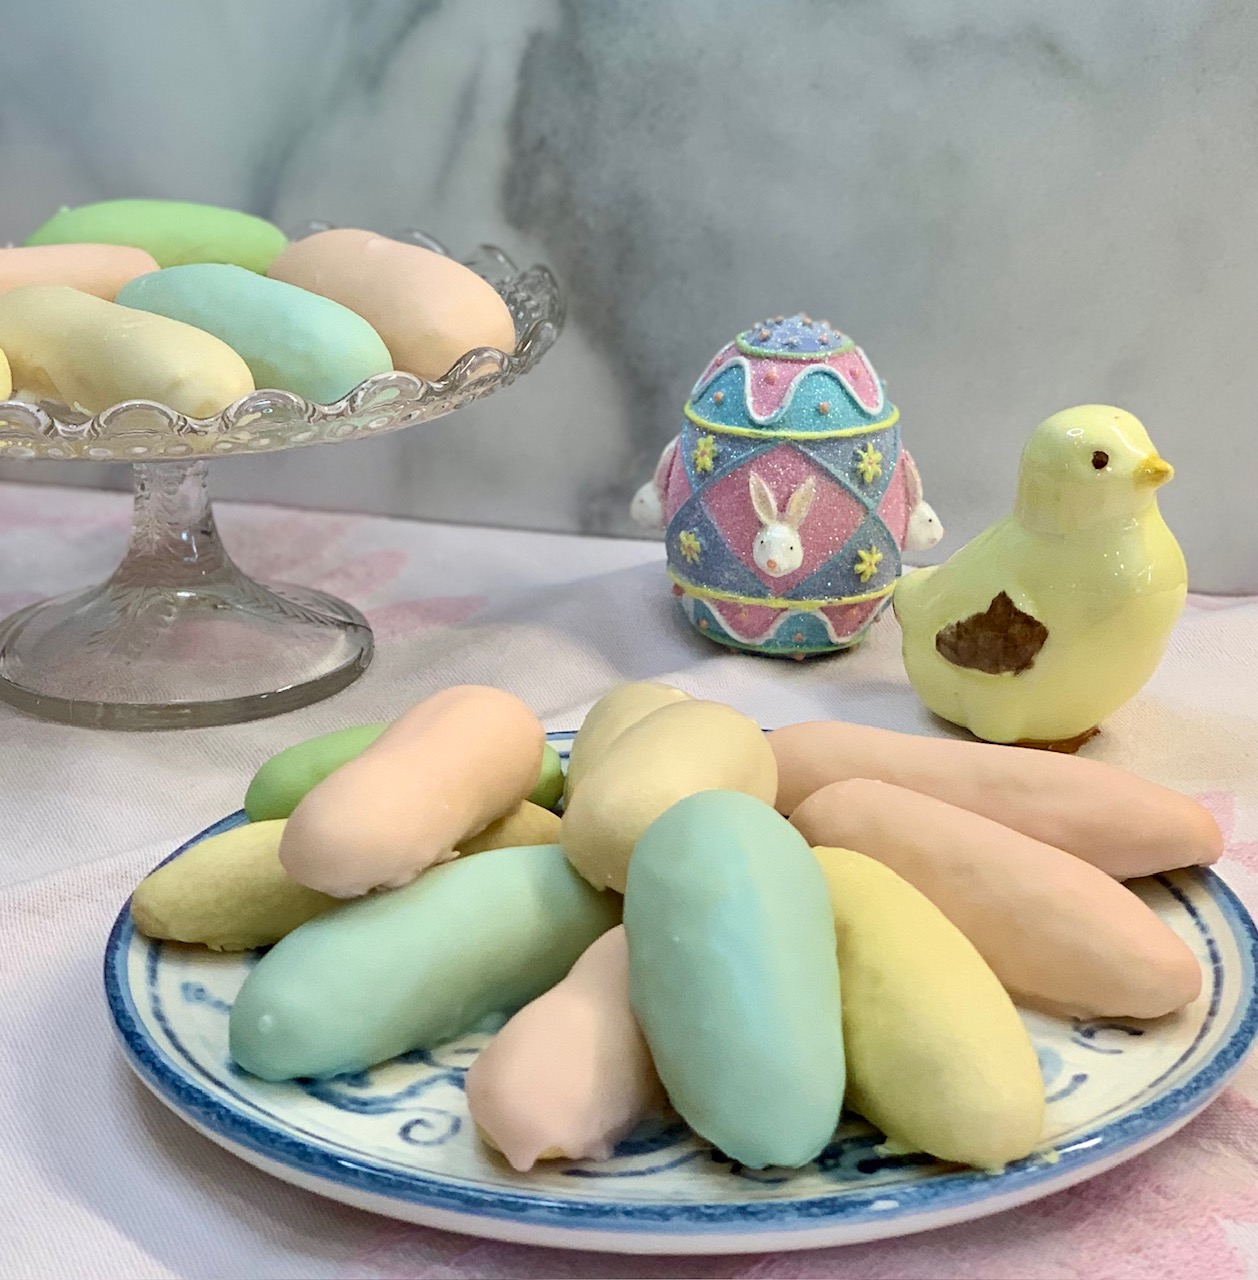

Your springtime celebration needs a pretty cookie and these Anginetti are just the thing. Also known as Italian Wedding Cookies, they grace the food tables at weddings and are always included at Christmas because no celebration is complete without them. You’ll also see them at graduations, and bridal and baby showers, too, but Easter is when they really shine. Delicately glazed, they are dainty and delicious, and when they are tinted light pastel colors they look just like spring.
Tender and butter cookie-textured, the cookies themselves are soft and not too sweet. They’re not overly buttery either, but adding the delicate glaze gives them just the right amount of sweetness. You can make them round or shaped like a ladyfinger, and flavor them with lemon, orange, anise, almond, or vanilla. We always made them ladyfinger shaped and flavored with vanilla, and always with a plain colored glaze. You could also decorate them with sprinkles if you like, using white glaze and different colored sprinkles for different occasions. If you go the sprinkle route, plan to glaze and sprinkle your cookies right before serving, so that the sprinkle color doesn’t bleed into the glaze.
As far as cookies go, this recipe is very quick and easy, and only requires a hand mixer. Be sure to have your butter and eggs at room temperature. To do this safely with your eggs, fill a small bowl with warm water, about the same temperature you would use for a bath. Place your eggs in the bowl and let them sit for 5 to 10 minutes, or until they no longer feel cool to the touch. Cream your butter with the sugar, add your eggs and flavoring, then mix in your dry ingredients. Let your dough chill in the refrigerator for at least and hour, and you’re ready to bake!
Our family, and plenty of others, trusted most of the cookie baking to my Aunt Carm, who of all my grandpa’s sisters, was my favorite. Besides being an amazing seamstress, she babysat from time to time. She read stories, and made fun snacks, and was especially tuned in to leaving the lights on when it was time to go to bed. She was patient and kind, and also happened to be an especially talented baker.
Aunt Carm’s cookies were perfection. A true work of art. Each cookie was about the size of your finger, with a perfectly rounded top. They were all the same size and shape and she tinted them just right. When it was Christmas, they looked like Christmas. When it was Easter, they looked like Easter. They were lovingly made entirely by hand in her small kitchen, but they were so consistently perfect it was hard to believe they were not made by a machine. She made cookies for most of the weddings, mine included, in the small town where I grew up. Her cookies were so distinctive you could tell just by looking at them that they were hers.
I tried baking them at Christmas, but they just weren’t the same. I had a hard time getting them all the same size and shape. Some spread too much. Some didn’t have the nicely rounded top. And some were just bigger than others. I tried a different recipe (below) and had better luck. I suggest refrigerating your dough for at least an hour. If you don’t refrigerate, your cookies will come out flatter, more like a traditional drop cookie, and won’t have the requisite rounded top.
Roll your walnut-size portion of dough on a lightly floured surface, rolling back and forth with the palm of your hand. Three inches in length is about the right size. My cookies baked in 10 minutes, so watch that first batch closely. Divide the glaze into smaller bowls so that you can make a few colors. I put a drop of food coloring onto a section of waxed paper and used a toothpick to just barely tint my glaze. And go ahead and double dip. After the glaze dried, I felt like my cookies still needed color, so I dipped again. (Oh, Aunt Carm! How did you get such perfect cookies?)
Store these single-layered in a large airtight container, and they’ll keep nicely for about a week at room temperature. Because you want these to remain soft, store them in something made of soft plastic like a Rubbermaid container. (Glass containers are better for keeping cookies crisp.) If you want to keep them fresh longer, I suggest storing them in a cool place, like your refrigerator.
At Christmastime, I take advantage of the cooler weather and use shelves in my garage that I keep dedicated just for this purpose. Stored this way, you can hold your cookies for about a month, if they last that long. For longer storage, use a resealable freezer bag and store your cookies in the freezer. Push as much air out as possible and your cookies will keep as long as no one knows where you put them. In all honesty, I have been known to pull out the last of the Christmas cookies and celebrate Christmas in July. And they are still perfect.
These little cookies are a pretty way to herald the arrival of spring. Don’t you want to bake some right now?
Anginetti
cookies
- 57 grams (1/4 cup) butter, softened
- 100 grams (1/2 cup) granulated sugar
- 3 large eggs, room temperature
- 1 1/2 teaspoons pure vanilla extract (or flavor with lemon, orange, almond or anise extract)
- 250 grams (2 cups) all-purpose flour
- 1 1/2 teaspoons baking powder
- 1/8 teaspoons salt
glaze
- 240 grams (2 cups) confectioners’ sugar
- 3 Tablespoons milk
- 1 teaspoon vanilla extract (or extract of choice)
- food coloring (optional)
Line 2 cookie sheets with parchment paper and set aside.
For cookies: In a large mixing bowl, cream butter and sugar with a hand mixer. Add eggs and vanilla extract and beat until well incorporated. Sift in the dry ingredients: flour, baking powder, and salt; mix on low speed until incorporated. Dough will be soft and sticky. Cover lightly and refrigerate for 1 hour or more.
Preheat oven to 350º F. Pinch off a walnut-sized portion of dough, then roll portion into a rope and place on prepared baking sheet, spacing portions about 2 inches apart. Or, using a small cookie scoop, drop 1-inch balls of dough onto prepared baking sheets, spacing balls about 2 inches apart. Bake cookies for about 10-12 minutes, or until firm and barely golden.
Remove cookies from cookie sheets and allow to cool completely on wire racks.
For glaze: Combine confectioners’ sugar, milk and vanilla extract and mix until smooth. Tint with food coloring if desired. Dip each cooled cookie into the glaze. Allow cookies to dry before stacking. Store airtight.
-recipe adapted from cucinabyelena.com
Donna Ferguson
I love to cook, garden, and write about all the things in Vancouver and the Northwest that make life so great.