Holly-day Treats, Part One…..

I’ve got a friend named Holly that shares a VERY deep love for food and cooking, much like I do. Actually, Holly is a self-described “renaissance mom”. She loves to cook, crochet, knit, sew, write and be a loving mother to her two rambunctious boys Victor and Rickey. She even makes her own hand made gifts that you can check out her Facebook page for Holly’s Handmade Gifts. Here’s the first installment of her “Holly-day” recipes she’d like to share. Look for more in the VERY near future….
Being a foodie, this time of year is especially wondrous to me. It could be the
perpetual dusting of white stuff around me (it’s either flour of powdered sugar, I can’t
tell), or just the excitement of bringing out old recipes and trying new ones.
This year, I followed a Christmas memory to a new recipe: Butter mints. My Great Aunt Ruby used to keep a glass bowl of butter mints out at her house in Vancouver, and when we’d go there to open presents on Christmas Day, I would gorge myself on those little ivory bites of joy. I started to search the internet for recipes, and found that butter mints are just too-thick frosting that’s been allowed to harden. Butter, powdered sugar, milk, flavoring, and coloring; this couldn’t be too hard, I figured. I was right – butter mints are super-easy to make, and my kids (ages 3 and 5) even had fun helping.
Holly’s Homemade Butter Mints Recipe
Yield: about 6 cups of 1/2 inch mints
8C confectioner’s sugar
16T (2 sticks) of butter, cold and cubed
4T milk
1t peppermint extract (more or less to taste)
food coloring (at your discretion)
Start with the butter and sugar in a stand mixer on low for about 8 minutes. Keep the mixer running and add the milk and peppermint at the same time. When the dough looks like play-doh, remove it from the mixer and place it on a surface dusted with powdered sugar.
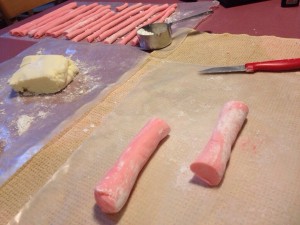
Kneed the dough together, and (I recommend using rubber gloves for this part) add a few drops of food coloring. I divided the dough into 2 parts and left one white and made the other half pink using about 5 drops of red food coloring. Once the dough is at colored the way you’d like it, re-dust your surface with powdered sugar and begin to roll the dough into strips about 1/2 inch thick. This is a great time to get the kids involved – it’s just like making play-doh snakes! You’ll want to work quickly at this stage, because the dough will begin to dry/harden and crack as it sits.
Once your dough “snakes” are rolled, cut the dough into 1/2 by 1/2 inch bites and place them on waxed or parchment paper, dusted with powdered sugar. Try to keep them from touching each other.
Leave the mints out at room temperature to dry. Shake them periodically to keep them separated. It may take a few days for them to harden all the way through, but when they do – oh, the melt-in-your-mouth-memories all come flooding back.
I love all things spicy. I joke with people that “I eat fire for breakfast” because I put sliced, fresh jalapenos on my bagels, and put a whole habanero in my fruit smoothies. I once read that spicy foods boost serotonin levels (the feel-good hormone), and I have been piling on the hot stuff ever since; I’d add that I’m a very happy person most of the time, so I believe it works.
This Christmas, I’m putting a spicy kick into my fudge-making. I love the classic marshmallow and evaporated milk fudge, and found that the Carnation fudge-kits are quick, easy, inexpensive (you can make 1.5 lbs of fudge for under $6 usually), and fun to customize. Last year, I crumbled peppermint candies into the fudge for a cool treat. This year, I’m going in the other direction, with burn-your-face-off hot habanero peppers.
Habaneros have a unique flavor (if you can handle the heat) that I find goes remarkably well with sweets like fruits and chocolate. Habaneros (also known as scotch bonnet peppers) are the base for the Jamaican jerk flavors, which incorporates other spices like cloves, cinnamon, and nutmeg, too. Hey wait a second…aren’t those some traditional holiday flavors? I think so! (That gives me an idea for next year’s fudge, actually…)
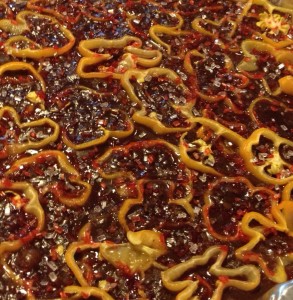
Back to the fudge at hand. I prepare the fudge according to the directions on the box, adding a few steps to the end. Before I start anything, though, I thinly slice 4 habanero peppers. What’s great is that sliced habaneros can be shaped like little stars, adding a neat holiday touch to the treats. I recommend using rubber gloves while you’re handling the peppers, because anything you touch after handling these delicious little bits of napalm will sting like crazy. Once the fudge has been prepared and poured into the pan, quickly place the peppers on top, pushing them into the chocolate mixture a little bit. If your peppers were uniform, you can line them up in little star patterns across your fudge. After the peppers are securely on top of the fudge, sprinkle some large crystal sugar over the top of the fudge and peppers. It should be enough so that when melted under the broiler (which is the next step), it creates a brulee-like crunchy top.
Once you’ve sprinkled sugar on the top, put the fudge on the top rack under the broiler in your oven (500 degrees should be just fine) with the oven door open. Or, if you’re lucky enough to have one of those little kitchen blow-torches, now is the time to use it. Watch your fudge until you see some of the sugar bubbling on top. Then, pull it out and let it cool. Cut into cubes and share it with your guests with care, just be sure to warn them – it’s HOT!


